
Internal sealing with a system
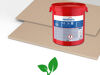
If waterproofing from the outside of the building is not technically possible or not economically justifiable, internal waterproofing systems are recommended. As a rule, internal waterproofing is caried out with rigid, mineral sealing slurries. Dynamic cracks cannot be permanently sealed with such products and radon tightness cannot be achieved either. The solution is called MB 2K.
MB 2K is the radon solution
Technically intelligent & sustainable
This combination solution is recommended for a radon-tight internal seal:
- Tested radon-tight and crack-bridging interior seal MB 2K
- Combined with the Power Protect [eco] system, an ecologically and economically sustainable renovation and insulation system - awarded the Blue Angel
- Easy installation
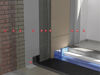
- 1. Preparatory work: Remove old plaster and paint up to 80 cm above the damaged zone and scrape out damaged joints 2 cm deep.
- 2. Primer: Apply Kiesol (1: 1 with water) evenly to the prepared substrate. Pre-wet highly absorbent surfaces with water.
- 3. Bonding bridge: Apply a bonding bridge of WP Sulfatex using a slurry brush within the reaction time of Kiesol.
- 4. Leveling: "Fresh-in-fresh" level all uneven surfaces with WP DS Level.
- 5. Sealing cove : Sealing cove with WP DS Level using a round trowel "fresh-in-fresh".
- 6. First waterproofing layer : Apply the first waterproofing layer of MB 2K sealing layer to the leveling layer using a slurry brush.
- 7. Second waterproofing layer : Apply the second layer with MB 2K "fresh-in-fresh" to the first waterproofing layer. Depending on the water exposure class, several layers may be necessary.
- 8. Bonding of Power Protect [eco] panels: Create a full-surface adhesive bed using the floating method with PP Fix on the dry waterproofing. Place the Power Protect [eco] panels against the wall, press on and align. Avoid cross joints.
- 9. First leveling layer with PP Fill: Apply PP Fill and reinforcing mortar with a toothed trowel to the top of the board (front side) in a layer thickness of 3 mm.
- 10. Reinforcement with Tex 4/100: Work the reinforcement fabric Tex 4/100 into the mortar in vertical, wrinkle-free strips using a smoothing trowel (allow individual strips to overlap by at least 10 cm).
- 11. Second filler layer with PP Fill: Apply the 2nd layer of PP Fill filler and reinforcement mortar approx. 2 mm on top of the sufficiently set reinforcement layer. To produce a fine, closed and paintable surface, remove excess PP Fill with the smoothing trowel and rub down if necessary after setting.